We offer a free artwork setup for this manufacturing service, ask one of our helpful team for more information.
If you're a bit of a whizz at setting your own artwork up, this tutorial contains everything you need to know about creating custom button badges using Adobe Illustrator, Adobe Photoshop and PaintTool SAI.
1. Download our template
Click >> here << to download our badge templates.
2. Creating your badge designs
Use the layers in our templates to create your button badge designs.
Please do not rename existing layers or create additional layers as this will confuse our systems when processing your designs.
‘Badge Face Line’ Layer
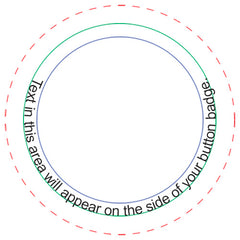
The blue circle on this layer acts as a guide to show your badges 'safe' zone. Use this as a guide when positioning your artwork on the 'PLACE ARTWORK HERE' layer.
'PLACE ARTWORK HERE’ Layer
Place ALL artwork onto this layer, using the blue circle on the 'Badge Face Line' layer as a guide.

The blue circle acts as a 'safe' area. Anything inside of the blue circle will appear on the front of your badge. Anything outside of the blue circle risks being lost when printed.
To prevent white edges from showing around the edge of your badges, fill the area between your safe zone (blue circle) and the cut line (red dotted line) with your design or with a colour. This is known as bleed.

Please make sure that any text added to this layer has been converted to outlines (CTRL+O for Illustrator) or Rasterized (TYPE > RASTERIZE TYPE LAYER for Photoshop).
'Perimeter Text Line’ Layer
The green circle on this layer acts as a guide for your 'ADD SIDE TEXT HERE' layer.
All text that you would like to appear around the edge of your button badges should sit between the green and blue circles.

'ADD SIDE TEXT HERE’ Layer
Place any text that you would like to appear around the edge of your button badges onto this layer.
Customise the sample text on this layer with your own text. Change fonts, colours, etc. Just make sure all text fits between the blue and green circles.
This layer is useful for adding details such as your company name or web address.

Please make sure that any text added to this layer has been converted to outlines (CTRL+O for Illustrator) or Rasterized (TYPE > RASTERIZE TYPE LAYER for Photoshop).
Delete or hide this layer if you don't want text around the edge of your badges.
'Cut Line’ Layer
We cut your badges out along the red dotted line before constructing them into quality button badges.
3. Submission checklist
Congratulations, you've finished creating your Pin badges. All you have to do now is check the following before submission...
- You have not renamed any of the layers in the template.
- All artwork is positioned on the 'PLACE ARTWORK HERE' layer.
- All artwork that you would like to appear on the front of your badge sits inside of the blue circle.
- All text that you would like to appear around the edge of your badge sits between the green and blue circles.
- All text on your artwork and side text layers has been converted to outlines / rasterized.
- Your template contains 1 design only. Additional designs must be sent using a separate template.
4. Saving and submitting your designs
There are 3 different ways to save and submit your badge designs...
1. Submit your artwork immediately
If you have already created your designs, you can send them to us using the 'Upload Artwork' button, located on our product pages or by emailing them to ‘hello@enamelpinfactory.com’.
Save all Photoshop and PaintTool SAI documents in .Psd format and all Illustrator documents in .Ai format. Here’s how…
Name each of your designs appropriately so that we know which designs you are referring to. Your file names should include 1. your name, 2. design number, 3. chosen product and 4. the date that you placed your order through our website. Here’s an example…

Select all of the designs that you would like to submit, right click and choose SEND TO > COMPRESSED (ZIPPED) FOLDER.

This will create a compressed folder containing all of your designs. Rename this folder so that it contains your name and the date that you placed your order on our website. Like this…

Please add all of your designs into one folder. So, if you purchased charms, stickers and pins, for example, just pop them all in the same, compressed folder and pass it our way.
2. Submit your artwork later
If you have placed your order via our website but your designs aren’t quite ready yet, that’s ok. You have up to 2 weeks to submit your artwork to us, which allows you to take advantage of any special offers that we’re running.
To submit your designs later, save them with 1. your name, 2. design number, 3. chosen product and 4. your order number. Then email them to ‘hello@enamelpinfactory.com’.
Here’s an example…

3. Placing a re-order
If you have placed an order in the past and would like to re-order those designs that’s great! We store your artwork for a maximum of 6 months, which saves you the hassle of having to resubmit your designs via email.
To place a re-order, simply place your order online, email us with your previous order number(s) and let us know that you are placing a re-order.
You may only want to order 1 or 2 designs from your previous order(s). To do this simply quote your old file name(s) and let us know how you would like them to be produced and in what quantities.
Here’s how to do it…
Hi,
I’ve just placed an order #12345 on your website and would like to re-order the following designs from a previous order #12121. Please can I have…
10x [YOURNAME]-DESIGN1-CLEARCHARM-12121
20x [YOURNAME]-DESIGN2-WALNUTKEYRING-12121
10x [YOURNAME]-DESIGN3-ACRYLICPIN-12121
Thanks!
[YOUR NAME]
If you have any questions about this tutorial or any other aspects of our website and manufacturing processes, please do not hesitate to get in touch. We’d love to hear from you.
